To Download the E-book of this tutorial, please click the link below:
I’m by no means an applique expert, but this is the way I do appliqués. I hope this tutorial will help any beginners out there that are confused by how this whole process works!
Finding and preparing an image to applique:
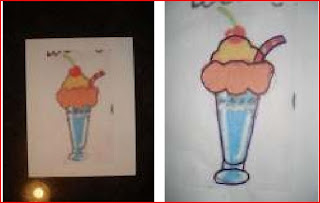
First, you need to choose a picture that you want to use for your applique. There is no need to purchase an “appliquepattern”. I like to search google images or photobucket to find the picture I’m looking for. If you find a picture youlike, just save it to your computer. Next, you can resize it with photo editing software to the size you’d like. You can also use images from children’s books, coloring books, etc… You can either trace these images, or use your scanner to put them onto your computer and then print them. For this particular project, I’m going to use an image that is on a piece of fabric (scanned the fabric, then enlarged the part I wanted in Corel Paint Shop).

Once you have the picture you want to use, print it out.
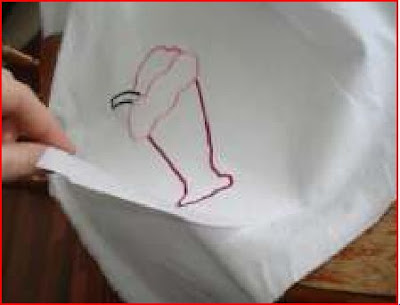
If you don’t want the picture to be reversed when you applique it onto the shirt, trace around the lines that you want to use on your applique with a permanent or some kind of dark marker that will show through the paper. When you’re finished tracing the lines you want to use, flip the paper over and you’ll have the lines you want to use, without all the extra details that you don’t. You can go over the lines again if they are too light.
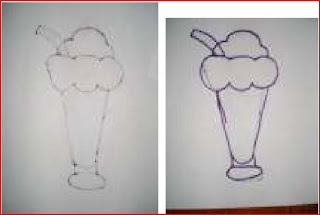
If you don’t mind the picture getting reversed onto your finished garment, go ahead and just trace the lines on the right side of the picture with a dark marker and use the right side for the following steps. Cutting your applique pieces: Next, you’ll need to get out your heat ‘n bond LITE paper (do not use ultra, only Lite). Put the paper over the side of the image you have determined in the last step.
Be sure that you place the smooth side of the heat ‘n bond up. You’ll need to decide which parts of the picture you want to do in different fabrics. After you have decided this, do each piece of the drawing that will be in a different fabric, on a separate part of the heat ‘n bond. You don’t want to just trace the picture exactly as it is, or you will not have room for overlapping.
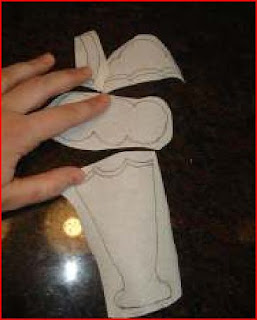
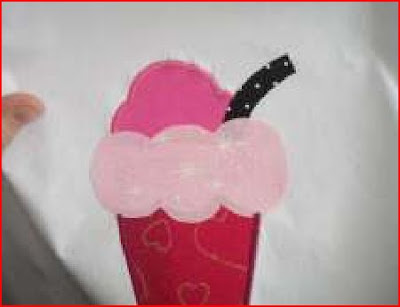
 Next, you’ll need to decide in which order you want to layer each piece. For this example, I wanted the sundae glass and the top scoop to be in the bottom layer, the straw to be in the middle layer and the middle scoop to be the very top layer. The bottom and middle layers will have to have an extra “seam allowance” so we can over lap other layers over them. So, I drew about ¼ inch extra seam allowance on each surface that will be overlapped with another piece.
In this instance, that was the top of the sundae glass, the bottom of the top scoop, and the bottom of the straw. The top layer will not have any extra edge on it because it will not be going underneath any other piece. Now, cut the pieces of heat ‘n bond out, leaving plenty of extra room around the pictures you have traced (don’t cut right on the lines!).
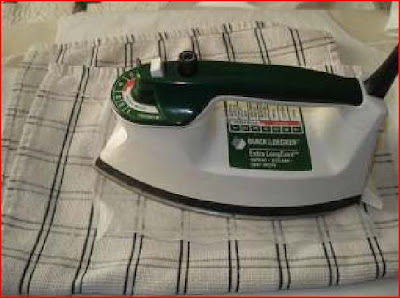
Next, get the different fabrics you want to use for the applique and iron all of the wrinkles out of them. After that, set your iron for the setting as directed on the heat ‘n bond (about a 2 on my iron). Place the cut pieces of the heat ‘n bond on the WRONG side of the fabric and iron them on . Now, take your scissors and cut out the fabric along the lines you have traced onto the heat ’n bond. It’s easier to cut nice straight lines since you left the extra heat ‘n bond around the edges.

Piecing together your applique and fusing it to the fabric:
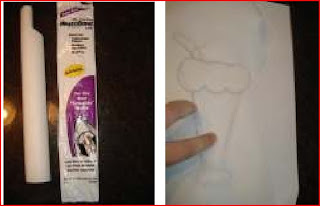
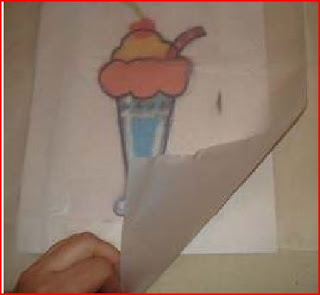
Next, you will assemble the applique onto your Teflon pressing sheet. I bought the one shown below at JoAnn for $7.99. The pressing sheet is the large plastic sheet under the bag in the photo.

Put the picture you are working with underneath the pressing sheet (the sheet is see-through).
Peel the paper backing off of the fabric pieces and lay them on the pressing sheet. You can secure each piece in place with the iron as you go (in an up and down motion, don‘t slide the iron around like you do when you‘re smoothing wrinkles). Make sure you start with the bottom layer and work your way up. Overlap the pieces at the “seam allowances”.

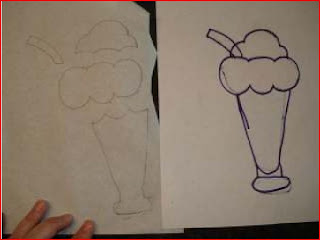
When you’re finished with this step, you’ll have a good idea of what your applique will look like. You can move the pieces around until you’re happy with how it looks. Then, give it a final press with iron. Wait until it cools, and then carefully peel the applique off the sheet, trying to keep all the pieces fused together. The really cool part about the Teflon pressing sheet is that the applique will peel right off of it, but the heat ‘n bond will still work when you iron it onto the garment.

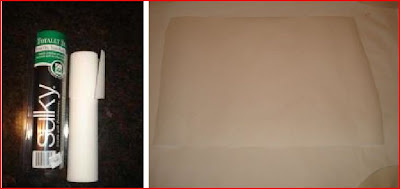
Next, prepare the fabric that you’re going to applique on. Iron all of the wrinkles out if it. Stabilizer will help to keep the fabric from puckering around the edges of the applique. I like the Sulky iron on, tear-away, stabilizer. Cut off a piece of stabilizer a little bigger than your applique and then iron it onto the WRONG side of the fabric. Don’t worry about it if the piece seems too big, you will be tearing away the excess when you’re done.
Now, turn the fabric with the attached stabilizer over so you’re working with the right side. Place the applique on the fabric where you want it to go. Make sure you have it centered and that you’ve taken the seam allowances of the finished garment into account. Iron it on, following the directions on the heat ‘n bond.

Sewing it on your garment/fabric:
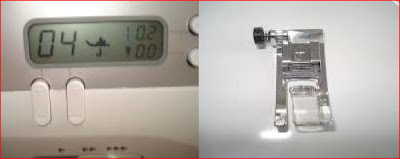
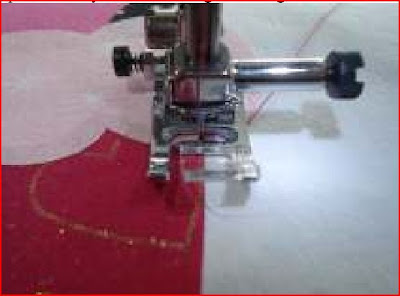
Now you’re ready to start sewing! The best kind of foot to use for applique is an applique foot like the one pictured below, or something similar. Try to use thread that matches each color you are using in the applique. If you use a different color to outline, it is easier to see the mistakes! Some people use a different color bobbin thread, but I haven’t mastered that yet. My machine always tends to pull the bobbin thread up to the top, so I use matching bobbin thread and top thread. I like working with polyester thread for applique. I don’t recommend metallic threads for applique- they break!! Start with the bottom most layer and work your way up to the top piece. In this example, I could either start with the sundae glass or the top scoop, since they are both in the bottom layer. Begin by anchoring your thread. I have found that the best way to do this is to set your machine on zig-zag, with a setting of 0.2 or 0.3 for the stitch length and 0 for the stitch width. Here’s what it looks like on my Brother CS6000i machine.
With your needle right on the edge of the applique, where you want to begin sewing, sew 3-4 stitches forward and then
*3-4 stitches back to anchor your strings. (see picture at the bottom for backstitch button)
Then, reset your width to approximately 4.0 and leave the stitch length at 0.2 or 0.3. Raise your needle and then make sure it will come down precisely on the outer edge of the applique, when the needle is in the right hand position of the zig-zag stitch. Stitch a few stitches to make sure it’s landing right on the edge. Now, just try to follow the edge of the applique.
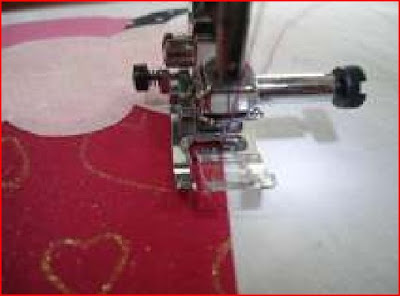
Now, what do you do when you come to a corner, or a turn?

This is where it gets tricky. You need to make sure you are turning your fabric the correct direction, with the needle in the correct position. In the above photo, you’ll need to lift the presser foot, with the needle in the down position, on the left hand side of the zig zag. Then turn your fabric to the right. You’ll leave your needle in the right hand position if you’re turning the other way. In the picture below, I went to the end point of where I wanted to stop, stopped with my needle in the down position on the right hand side and then turned my fabric right and continued zig-zagging.

This next photo shows what happens if I would have stopped with the needle in the left hand position and then turned my fabric right. You can see that it doesn‘t make a point on the corner if you leave the needle in the wrong position before turning.:

This same rule applies if you’re going around a curve. Here’s a curve where I stopped the needle in the wrong position before I turned my fabric:

This is something you can’t really learn by reading it. You just have to practice. The correct needle position and turning technique will become second nature with practice. When you’re done going around the first layer, set your stitch width to 0 again and backstitch 3-4 stitches and go forward 3-4 stitches to anchor your thread again. I like to clip my threads at this point. I cut them very close to the garment. If you anchor them as shown, they shouldn’t unravel.

Change your thread to the color of the next layer and go around that.
Continue doing this until you finish the top layer of your applique.

Now, turn the fabric over and rip off the excess stabilizer:
 YOU’RE FINISHED!!!! Except for the little task of actually sewing the clothing together, that is!
 Miscellaneous tips:
*If you happened to try to iron your stabilizer on the wrong side and it got your iron all gunked up, just get out an old towel and a sheet of fabric softener. Put the fabric softener on top of the towel and run your iron over it a few times. It will generally take the gooey stuff right off. Not that I have ever done that or anything ;o).
*Lots of people will tell you to go slow and take your time when appliquéing. But, I seem to do better looking appliqués, with smoother lines, when I go fast! LOL! Just experiment and see what works best for you.
*If you’re going to applique a face, it’s best to hand-embroider the eyes/nose/mouth. It’s really hard to get a face to look good with machine applique, especially if you’re a beginner. Here’s a link that has videos of the different embroidery stitches. http://www.needlenthread.com/2006/10/video-library-of-hand-embroidery.html I like the whipped back stitch for outlines and the satin stitch for filling in. Here are some examples of hand-embroidered faces:

If the character you’re appliquéing has larger features, like the ones below, it’s a little easier to use the machine and appliqué the faces. I also like to “cheat” by using buttons and such for some of the smaller features, like the turkey’s eye below. Be creative!

*When choosing fabrics for your applique, try to stick with patterned fabric (thanks for that tip, LisaZoe!). It doesn’t fray like a solid fabric will and it adds more texture to your applique. Remember that you can also use the back of the fabric for a different look.
*If you can’t find the right picture to use as a template for your applique, you can capture a picture from a movie. I like to use the program Intervideo WinDVD for this. The program came with my computer. It has a little camera on the menu while you’re watching the movie. You can just click the camera at the spot you wish to take a picture. It will take the picture and you can save it as a file. Then, use it as an applique template. This is how I got the Cinderella picture above.
*For more applique and other sewing tips, check out Teresa joy’s bookmarks: http://www.mybookmarks.com/public/teresajoy/#current

*The backstitch / reverse button usually looks like an arrow pointing backwards, as in #2 of the picture above.

6 comments:
I also have the Brother CS6000(i) and I don't believe it has a backstitch :( Does your machine? I am just not completely sure how to stabilize the thread. Thanks for any suggestions (as I am a beginner)!
Tiffani
Tiffani, the backstitch/ reverse button is the one that has an arrow pointing backwards on it (kind of like a horseshoe).
I posted a picture from the Brother CS 6000 manual, so hopefully that will help you find it.
Teresa, THANK YOU so much! I read somewhere online that this model didn't have a backstitch option, and me not knowing any better believed it!!!! You have made me love my machine even more!!!!!
Tifani, I'm so glad I could help!! Have fun sewing!
Have you had a problem with the stitch not picking up on the right side? I have the same machine and it does it constantly.
Post a Comment